My Scrapbooking Cat

My Scrapbooking Cat
ready for scrappin' action

Sunday 30 December 2012

Christmas Layout with Doodlebug

 Did you survive Christmas? It was a very busy and tiring week of dinners and presents and of course Boxing Day shopping for me! And now, lucky me, I have a post Christmas cold! Not enough sleep and way TOO much junk food! I had my box of kleenex and some quiet time to scrap this Christmas page today. This was one of our Christmas card pictures this year, which I think is rather cute. We try to do something funny every year for our cards. Next year, hopefully there will be 3 in our festive picture! wink, wink!

 I used this year's North Pole Collection from Doodlebug to create this layout. In this banner I had to improvise with the letter "e" as I ran out on my Simply Sweet rub-on sheet. I had to use a "c" and then a bracket to make the letter "e". I punched the banner using a Fiskars punch.

 I used an EK Success border punch on the red paper and tucked the flags under it. I ruffled the ends of the Doodletwine on both banners.

The title was from awhile back but is also Doodlebug (headlines). I added a red Doodle pearl to the dot of the i.
I also added a white pearl to the center of the three snowflakes, which are placed in a triangular shape on the page.

And now for New Year's Eve......Hope you all have a wonderful New Year and happy crafting in 2013!

Sunday 23 December 2012

Back With More Christmas Ideas!

 So I am WAY behind on Christmas stuff! Tomorrow is Christmas Eve and I am not done shopping, wrapping, or baking. I tell myself that some how, some way, it will all get done. At least I finished my cards!!! This card was a variation on the one I posted earlier. I bought the snowflake border from Memory Box and created this card. I used the same silver papers and again, embossed the sentiment. A pretty simple card but easy to mass produce!

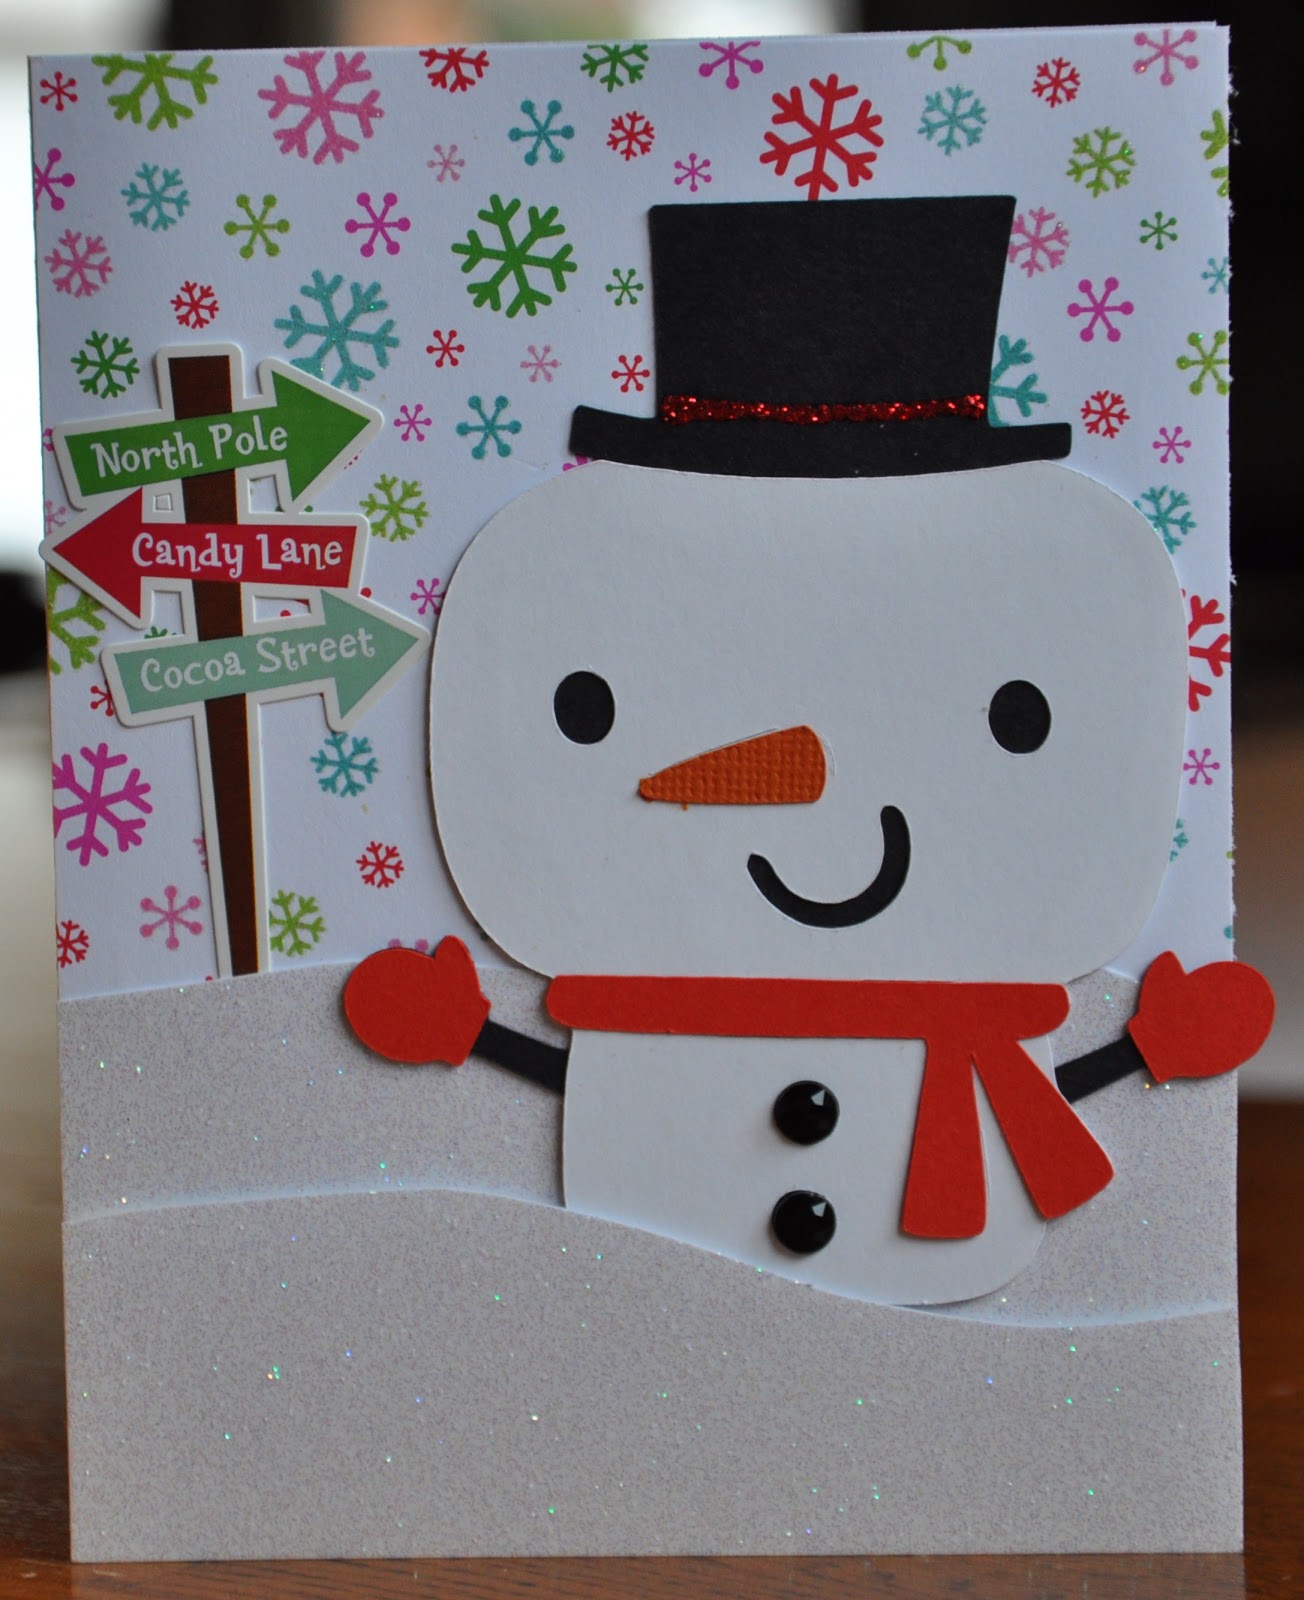
 I got this idea from the Doodlebug website but altered it to make it my own. I used a Doodlebug mini card and ripped off the bottom of one side. I glued Doodlebug paper to the back. I cut some black paper to make the belt and yellow glitter Doodlebug paper to make the buckle, which was punched using squares punches. I added a tag which I stamped and added a strip of Doodlebug patterened paper. I also added some Doodle twine. I glued the sides of the card to make a pocket for the tag.
                      The stamp is from Technique Tuesday and I used silver ColorBox ink.

 Need an ornament idea? I bought these big bottle caps from Archiver's by Maya Road. I added Doodlebug paper to the background. I pop dotted one layer of the white glitter paper. I tucked in the mini Doodle Pop snowmen and a tree and viola! I stickled the heart on the tree. I used my Big Bite to punch a hole in the top and added silver ribbon to hang it on my tree!

                                     This one is the same but it does not have a tree.

 I made this ornament last year with Doodlebug paper and a snowman sticker. I added glitter to the tin so when you shake it, it is like a snowstorm. Very glittery!

 At Michael's you can buy glass balls for do-it-yourself decorating. This is probably the easiest ornament in the world to make. I cut some garland and stuffed it into the ball. I added gold ribbon to the top and that is it! When it catches the lights of the tree it shimmers and actually looks quite elegant, I think.

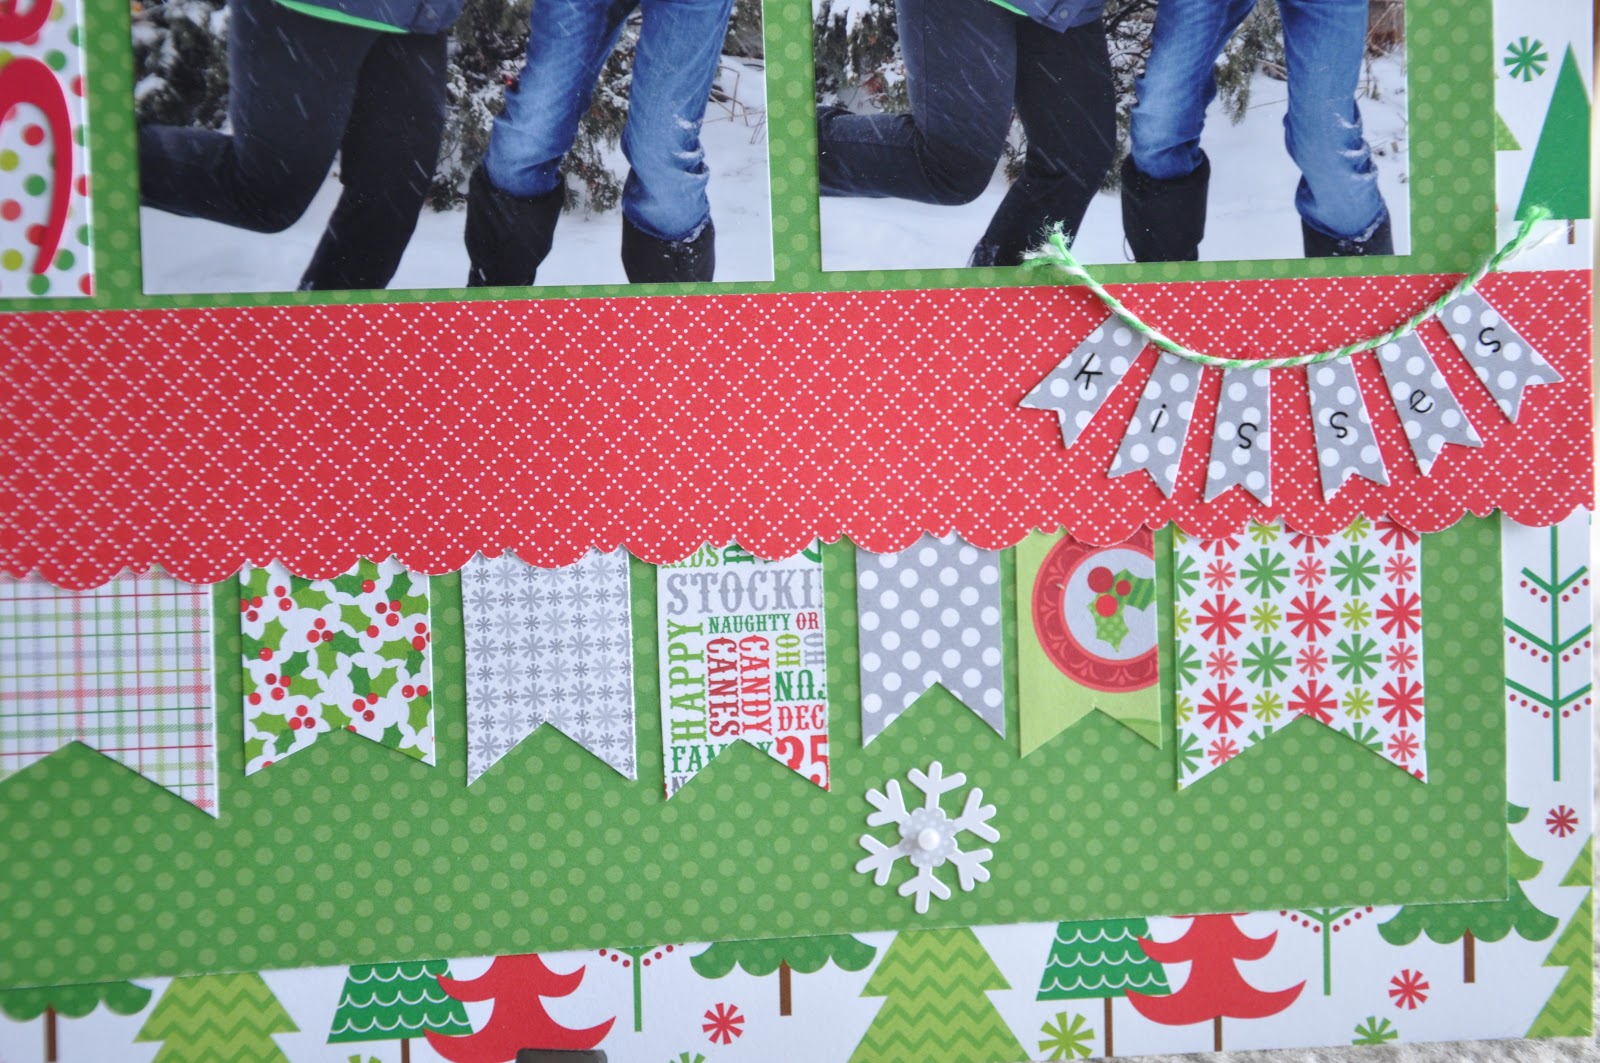
There was a layout on the Bella Blvd. Blog that had pictures taken in an ornamnet. I loved this idea and decided to try it myself! This is such a cute Christmas picture!

Merry Christmas Everyone!!!! Remember to enjoy time with family and loved ones this holiday- it is not about the gifts, baking, wrapping, dinners, etc. It is memories made with those who matter.

Friday 7 December 2012

I Found a Fix!

So here is my Christmas card for this year. I have only made 8 of them so far and I need way more than that! Hopefully I will get these ones mailed out first to my out of towners, maybe this weekend. I also realized I need to find envelopes now for this size of card- yikes, there is always something!
I embossed the sentiment, which turned out to be a learning process. I am not a stamping/embossing person so that was all new to me. I also added silver ribbon to the side of the card to finish it off.

Now, I have to find time to make my annual ornaments, finish my cards, do some kind of baking, finish buying gifts, and of course take our Christmas picture! Only 2 more weeks.....scary!

Monday 3 December 2012

Simple Christmas Cards

 I made this card using a mini-Doodlebug card and a die cut sentiment. I added a few snowflake stickers and that is it- very simple!

 I used a Memory Box poinsettia tree die cut on Doodlebug glitter paper. I adhered it to 2 different shades of silver paper. I stamped a sentiment in silver at the bottom but it does not show up in the light. I need to find a fix for this since it might be my "it" card for this Christmas.

I used red and green cardstock for the background and just plain white paper for the same tree as above. I added pearls to the flower centers on this tree and stamped the sentiment in white. I don't like this one as much as the silver version but I thought I would share my experiments.

Friday 30 November 2012

Christmas Cutie with Doodlebug

 Phew, I ran out of storage for photos on this blog so that put me out of blogging for awhile but now I am back!!!

I made this layout using Doodlebug papers, Teensy letters, and Doodle pearls. I also used a stamp from Technique Tuesday with black ink and a Memory Box die to make the snowflake swirl. The darker green dotted paper has a punched border from an EK Success binder border punch and the red paper is also punch with a border punch from Ek Success.

 I added bling to the snowflake centers on this diecut. I used different sized pearls here.

 This is my cat Taz. He loves the Christmas tree and can be found lounging under it for all of December.
 

I made this mini-card very quickly. I used a Sizzix Bigz die designed by Basic Grey to make the snowman. The background is Doodlebug paper as is the plaid paper for the hat. I added black pearls for buttons. I stamped the sentiment using a stamp from Technique Tuesday and black ink. I used a snow writer for the snow.

I am going to have to play catch up now since I have been making cards since I have been away. Lots more to come!

Sunday 18 November 2012

Snow Much Fun To Make Cards!

 I just got back from my shopping trip and I found some great deals! I loaded up on scrapbooking supplies too! I was at Archiver's last weekend and I made a very cute snowman make n' take. It inspired me to make this snowman card. The Archiver's sample had a trifold pocket with a baggy full of marshmellows. This is the same snowman face but just a simple card. I used a Cuttlebug embossing folder to add snowflakes to the snowman's face. I added black Doodlebling for the eyes. I used a Sharpie for the mouth. I used a triangle punch for the nose and I crinkled it. I cut the black hat from black cardstock. I used a Marvy Uchida holly punch and added unknown red pearls for the berries.

I bought a whole bunch of Doodlebug's mini cards. They make cardmaking so quick and easy! I added a snowflake Doodlepop to the front and the teensy alpha's for the sentiment and viola! A quick card made in a minute!

Wednesday 7 November 2012

Doodlebug Christmas Card #2

I made a quick little card today with my new Doodlebug supplies. I used the patterned paper from the 6x6 paper pad for the card base. The stickers are from this collection called North Pole and I added pop dots to the bird and the snowman to add dimension. I used my snow writer pen again to make some snow on the sign and the trees. I stickled the heart and the white parts of the candies on the tree. I also added Doodle Pearls on the top tree.

I will be going on a shopping vacation this weekend and will be away from my blog for a few days!
Hopefully this means I will return with plenty of new scrapping goodies and a load of inspiration!!
                                                         Happy Creating!

Sunday 4 November 2012

Christmas Card With New Christmas Doodlebug!

 I just got my hands on the new Christmas collection by Doodlebug and if you have not seen it yet- it is SOOOOOO cute! Or maybe I should say Snow Cute! I was super excited to start creating and I came up with this cute card last night. The mini Doodle Pops are just adorable and will be a favorite on my Christmas cards this year! I purchased the 6x6 paper pack and used the snowflake paper on the front of a Doodlebug card base. I cut the paper slightly smaller than the front of the card and then pop dotted it. The card had a window in the front and I hand cut an opening in the snowflake paper to match. I used a Doodle sentiment in green. I also stickled the snowflake centers but it does not show in this picture.

 I used the square that I cut out of the front snowflake paper for the background inside the square. I cut a tree branch free handed from brown Bazzill cardstock. I added a red bird Doodle pop and then I added fake snow using a snow writer that I purchased at Michaels.

                                               A closer view of the bird on the branch!

Saturday 3 November 2012

Halloween Night- Very Spooky!!!

 Here is my graveyard and spooky Halloween decor! I was in such a rush on Wednesday to put it together before the trick-or-treaters came out. I expanded my graveyard this year and we also bought a new ghoul (seen below) which we hung on our chimney. Every year my plan is to add on to our decor so maybe eventually it is like a mini haunted house. The kids certainly enjoyed all the skeletons and the arm that was sticking out of our garage door! Even the little ones seemed curious about it. It was really windy and misty on Halloween night but we still managed to get a great turnout- and not too many older kids either!
I was very excited to do my zombie make-up on Halloween! I am a gore lover- my favorite shows are The Walking Dead and American Horror Story! I have become quite the zombie fan so I was waiting all week to try out my new make-up. I made myself into a zombie scientist. I can't wait to scrap these pictures! Hope you all had a Happy Halloween!!


Tuesday 30 October 2012

Check out the Halloween mullet!!!

 Okay, so when I was a kid Halloween was NOT about store bought costumes- it was all about making up your own cool costume using whatever odds and ends from home. In the 80's, it was super cool to be a punk rocker for Halloween and for some reason I had a mullet! So that is what I was...(I am in the back row with the awesome white sunglasses!) The trend back then was also that hair dye in a spray can. It was my Halloween staple for a few years! And I loved that it would stay in for a few days so I had coloured hair when I went to school the next day! My sister and I would easily get 2 pillowcases full of candy every Halloween! Our neighbours were people we knew and trusted so getting candy apples and popcorn balls was a huge treat and not something we had to worry about. I have so many wonderful memories of Trick-or-Treating with my dad and my sister! No wonder it is one of my favorite times of the year!!!

I used Doodlebug products for this layout. This year's collection: Haunted Manor is so cute! The title and the bat are from last year's collection. I used an EK Success border punch on the black strips by the photo and the striped strips. I made faux stitching on the orange paper using a Sharpie.
                                                                        Fun times!!!

Monday 29 October 2012

Random Christmas Cards

 Every year I buy the Holiday Card Ideas magazine by Paper Crafts and I usually have good luck finding some ideas for card designs. I have already purchased this year's issue but I have yet to find that special card that I will be sending this year.

Here are some ideas! This card is very simple to make. I embossed vellum with a Cuttlebug Snowflake folder. I attached the vellum to the Bazzill dot cardstock using double sided tape and then hid the tape using ribbon on top. The sentiment was a rub-on.

 I did not buy enough of this pink paper by October Afternoon: Good Cheer to make more than one card :(
I used brown Bazzill cardstock for the background. I used a Martha Stewart border punch to make the scallop dotted border on the pink dotted paper, also from October Afternoon. The sentiment was done with alpha stickers and the deer was a rub-on from Basic Grey. I also added 3 bling to the snowflakes.

I think this is one of my favorite Christmas cards. It is so simple yet I think the paper is just so lovely. I used brown Bo Bunny Double Dot paper for the background. The ribbon is from American Crafts. The sentiment is a rub-on. I bought the bell (came in a big package of them) at Hobby Lobby. The gorgeous paper was Making Memories:FaLaLa.

Maybe November will inspire me to find that perfect Christmas card! 2 days until Halloween! Can't wait to post my scary yard and my attempt at zombie make-up this year!

Wednesday 24 October 2012

Snow Cute!

I am back today with another Christmas card! I just bought the new Cricut cartridge Create A Critter 2 and it has some really cute characters for the holidays! I made this snowman using my new cartridge. I added Doodle bling for the buttons and I added a red stickle stripe on his hat. The paper is from Doodlebug. I pop dotted the top layer of glitter paper and tucked the snowman behind it so it looks like he is in a snow drift. I added an Echo Park Christmas sticker to the background.

Thanks for the comments on my posts- it is so nice to know that you enjoy my creations! I hope that you find inspiration in the things I make!

Monday 22 October 2012

More Christmas Cards!

 We are safe from the snow for now- only rain tomorrow they say! But it is time to plan those Christmas cards! I made this card using my Cricut and the cartridge Winter Frolic to make the ornaments. I used a Martha Stewart punch to make the pine tree boughs by punching many of the leaves and putting them together. I used a rub-on for the title and I added a Recollections bling to the bottom ornament. The background paper was from My Mind's Eye: 12 Days Of Christmas. I used Bazzill cardstock for the ornaments.

 I decided to break out my dry embossing templates for this card. I have a whole stack of Lasting Impressions templates and I still love them! These snowmen are super cute and I dry embossed them onto white cardstock. I used a Sharpie marker to colour in the nose, eyes, and mouths. The pink and blue hats were embossed on Lasting Impressions paper. I used old Christmas Doodlebug paper for this card and the So Sweet Cute Cut. I added 2 bling to either side of the Cute Cut. I used a tab punch for the top and the card pulls out of the pocket as seen below.

 I made a second version of this card using the same snowman embossing template from Lasting Impressions. I used various snowflake punches and added a bling to the centers. I used old winter Doodlebug paper to make this card. The stripe part is a flap that lifts to reveal the sentiment.

       I have a thing for snowmen, snowflakes, and santas. Chrismtas is so much fun!

Friday 19 October 2012

Halloween with Doodlebug

 I had intended to make some Christmas cards with my Doodlebug stuff but then somehow I made a Halloween layout instead! I just adore the Mini-Doodlepops from this collection- Haunted Manor. I started with black cardstock from Bazzill. I cut a stip of the green dotted paper and then used an EK Success border punch for the zig zag strip in the purple dot paper. I added the fence sticker and put the pumpkin Mini Doodlepops on top.
 The cobwebs are from the package you can buy to decorate your house. Not the easiest stuff to work with on a layout but somehow I managed to get it to work. I added Mini spider Doodlepops to the ends of 2 strands.
 I added more cobweb at the bottom corner and then had some cobweb trailing down the side with a spider sticker at the end. I used a circle punch on the spider paper and tucked it behind my photo. I used 2 of the Cute Cuts from this collection for my title and sub-title. I made my husband up as a zombie last year for Halloween. It was my first time experimenting and I am so excited to try again this year!
I really wanted to do something with pumpkins sitting on a fence because it reminds me of that Halloween poem from elementary school. 12 days til' Halloween........I am so excited!

PS: I used Becky Fleck's sketch below for this layout!

Wednesday 17 October 2012

Fall is Here!

It was my mom's birthday last weekend so I made her this fall inspired card using paper and stickers for Simple Stories. The sentiment was a sticker from Bella Blvd.'s Thankful line. I also inked the edges using a brown from ColorBox. I stickled the red berries as well.

I guess I have not been feeling too inspired these days! I am not sure where my time is going- too many things going on I guess. I am hoping to get to some Christmas cards today.....only 70 something days I think. I keep seeing these reminders everywhere!

With Halloween around the corner it is also time for me to start planning my spooky yard decor! I love decorating for Halloween! We made a little graveyard last year on the side of our house. I bought a huge ghoul to hang up this year and some more tombstones to expand the cemetary. I just love anything spooky!

Wednesday 10 October 2012

Christmas Cards!

 I am trying to find my signature Christmas card for this year and I am having no luck! Every year I come up with an idea for a card that is easy to replicate so I can make a mass of them to hand out. These cards are a few that I have used in the past. This stocking was made using a die and embossing set from Sissex that came out last year. I added some stickles to the Merry and added a gold rick rack ribbon and I had a simple but cute card.

 For this card I used a scallop Spellbinders nestibilities die on aqua paper and white cardstock. Many years ago, Doodlebug came out with a set of 4 Cuttlebug die cuts that included this snowman and the trees. I added stickles to the snow, the buttons on the snowman, and I added stars to the trees. I used a Sharpie to colour in the arms and the eyes on the snowman. So cute and easy to replicate!

I used my Cricut and the cartridge Three Birds On Parade for this card. I used a Spellbinders nestibility to make the shape "Label 1". I embossed the background using a Cuttlebug Snowflake embossing folder. I die cut the bird and title using the Cricut machine. I added some fake snow to the hat, scarf, and boots which I purchased at Micheals. I used Ranger black pearls for the eyes. The Cricut machine allowed me to make many birds at the same time so I could replicate this card over and over fairly quickly.

Apparently Christmas is 11 weeks away so it is time to start thinking about making those cards!!! I hope you have found some inspiration to get started!

Monday 8 October 2012

Back to Bella Blvd.

 I was feeling inspired for Christmas with the big dumping of snow we had this week!!! Thankfully the snow did not stick around but it is a sign that winter is around the corner. And that means it is time to think Christmas cards! I used Bella's Christmas line from last year to make this card. The tree was Ciao Chipboard and I added some Doodle bling and stickles to it.

 I used Bella's Birthday Girl line for this layout of me when I was 5 years old- check out that unruly hair!!!! Yes, my hair is wild and curly and when I was very young it was very blonde!! I have learned to manage my crazy locks these days. I used to love Oreo cookie cakes when I was little. I loved my birthday because it meant all kinds of treats that I just did not get on any ordinary day. Good memories!

                      I used some Ciao Chipboard, flags, and buttons on the left side of the page.

Bella's sticker sheet always includes alpha stickers to match the line- so handy! and that is what I used for the title.

 I used 3 border strips, one above and 2 below my picture. I also mounted my black and white photo on white cardstock.

Many people scrapbook their kids or family and too often forget to scrapbook themselves! Find a photo of yourself and cherish the memory by making a layout of just you! My husband certainly got  a laugh out of this one of me!!!!